Home Assistant 0.45: Automation editor, Z-Wave panel, OCR

12 minutes reading time
  • Release-Notes
Comments

Welcome to another great release of Home Assistant! While some of contributors and users are gathering at PyCon US 2017, we still managed to get a great release together!

First thing for this release is a feature that has been requested a lot: an automation editor! It’s still experimental - and many things are still in progress - but it works! You can create new automations and edit existing ones. If you start a new config, you’re all good to go. Otherwise check these instructions to get your automations ready for editing in the UI.

Check this video by Ben from BRUHautomation to see the new release in action.

As the editor is experimental, there are some limitations. These include that Chrome/Chromium is the only supported browser, we don’t support all triggers and actions and there is no support for conditions yet. But the foundation is there and so if you want to contribute to this, come help!

On the Z-Wave front a lot has happened. The biggest one is that we have a major extension of the Z-Wave panel thanks to @turbokongen! You will now be able to change config parameters and manage your devices.

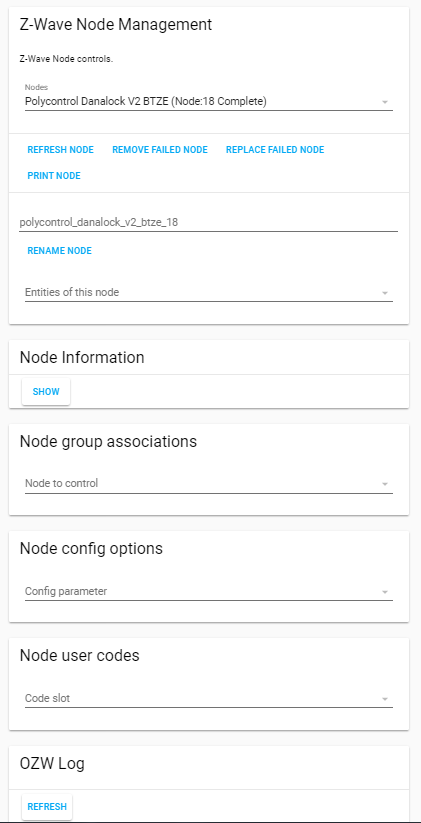
Thanks to the work by the Python Open Z-Wave team we are now able to install it on demand from PyPi! There is no longer a need to pre-compile it yourself. This should give us the guarantee that we work with the Python Open Z-Wave version that the code expects.

If you have a security key set in your Open Z-Wave options.xml, copy options.xml to your Home Assistant configuration directory. This is the only place where options will get persisted.

Next to that @armills has lead the charge and managed to get full test coverage for Z-Wave! Thanks for all the hard work!

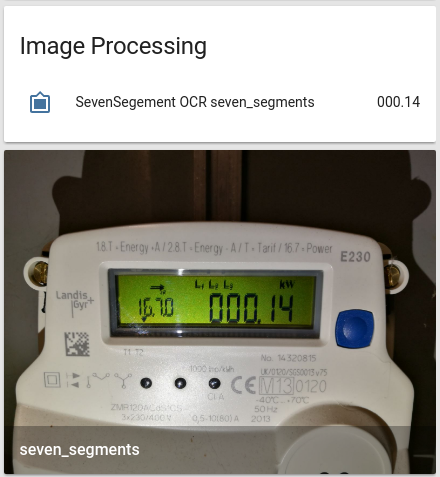
This release also contains two integrations which could help you to make non-smart devices a little smarter. The file sensor and the seven_segments OCR image processing platform. The first simply reads a plain-text file which was created by a logger or alike. The latter one extracts the value from a captured image that shows a seven-segments display.

And last, but not least, our Docker image is now based off Python 3.6. This version is faster and uses less memory than Python 3.5. Win!

If you are using our experimental Hass.io image, we made a breaking change in how the panel is served. If you have an existing installation, make sure you update your supervisor to the latest version before updating Home Assistant. If you are going to flash a new Hass.io image, make sure to only flash the new 0.8 image as linked on the installation page.

New integrations

Release 0.45.1 - May 22

If you need help…

…don’t hesitate to use our very active forums or join us for a little chat. The release notes have comments enabled but it’s preferred if you use the former communication channels. Thanks.

Reporting Issues

Experiencing issues introduced by this release? Please report them in our issue tracker. Make sure to fill in all fields of the issue template.

Breaking changes

Read on →

Home Assistant at PyCon US 2017

Less than one minute reading time
  • Community
Comments

In just 12 hours PyCon US 2017 starts. This is an exciting conference because there will be a bunch of Home Assistant developers and users there being able to meet in person.

Just like last year, we’ll be hosting a Home Assistant Open Space. Please stop by to ask any questions you have to the available developers. We haven’t reserved a slot yet but will do so tomorrow. We’ll update this post and announce it on social media as we know time and location. First open-space will be Friday at 4pm in room B112.

We will also be taken part in the development sprints from Monday-Wednesday. You only need to bring a laptop. We’ll help you get set up with a dev environment and you can be coding on top of Home Assistant in no time. Exact location inside the conference center to be announced. We are sitting in room A108.

On a final note, the Home Assistant community is very very active so don’t take it personal if we don’t remember your name, issue or contribution.


Home Assistant on an Orange Pi Zero

four minutes reading time
  • How-To
Comments

This blog post is about the setup of Home Assistant on an Orange Pi Zero. Like the setup on a Raspberry Pi Zero it will only take a couple of minutes to get a fully functional super cheap (less than 18 Euro incl. casing and power supply) Home Assistant hub. The reasons to use an Orange Pi Zero beside the prize are the built-in Ethernet port and the availability.

Read on →

Grazer Linuxtage 2017: Python Everywhere

Less than one minute reading time
  • Community
  • Micropython
Comments

I like Python. It’s a clean easy to read, easy to learn language. Yet when you use it for some time you still find more features to improve your coding. What I probably like most about Python is the community and the great libraries that already exist. Often solving a problem means including a pre-existing library and writing some glue code. That makes it quick to get things up and running.

I just gave a talk on how you can run Python to automate your home (yes with Home-Assistant) but also with MicroPython. Micropython allows you to run Python on your DIY sensors and switches around your home. Python everywhere - even on the chips that give Home-Assistant the data to be awesome.


Home Assistant 0.44: ZigBee, OpenCV and DLib

14 minutes reading time
  • Release-Notes
Comments

This release brings some great new integrations. The biggest one is the native ZigBee integration by Russell Cloran. This will allow Home Assistant to natively control Philips Hue lights without the need for a hub! (IKEA Tradfri lights not yet due to implementing a different profile)

Another great new addition is OpenCV by Teagan Glenn. So now you’ll be able to unlock all the cool stuff from OpenCV right in Home Assistant. And if OpenCV is not your style, you can try out the new DLib integration added by Pascal Vizeli in this release.

This release also includes a new component to dynamically generate RSS feeds based on a template. This means that any RSS widget on your phone, tablet or computer can now be used to show Home Assistant data!

And finally, for users of the config panel in the UI, we have fixed the issue with the group editor.

Enjoy!

If you need help…

…don’t hesitate to use our very active forums or join us for a little chat. The release notes have comments enabled but it’s preferred if you use the former communication channels. Thanks.

Reporting Issues

Experiencing issues introduced by this release? Please report them in our issue tracker. Make sure to fill in all fields of the issue template.

New integrations

Release 0.44.2 - May 8

  • Fix opening add-ons in Hass.io store that are not installed (@balloob)

Release 0.44.1 - May 7

Read on →


Home Assistant on a Pi Zero W in 30 minutes

1 minute reading time
  • How-To
Comments

Saw the announcement yesterday for HASSbian 1.21 and got super excited?

Today we’ll flash the latest HASSbian to a Raspbery Pi Zero W. With an added bonus that besides for an USB cable for power, there’s no need for any cables!

What you’ll need:

  • a Raspberry Pi Zero W (an amazing tiny computer with built-in wifi)
  • a microSD card
  • some source of USB power
  • Wifi
  • a desktop or laptop

Let’s get to it!

First, download the HASSbian 1.21 image from here.

Unzip it.

Flash it to the microSD card. If you need a flash tool, try Etcher

When the flashing finishes, remove it and plug it back in. You should see a drive called “boot”.

Right in there, not in any folders, create a file called wpa_supplicant.conf.

The contents of the configuration file should be something like this: (You may have to adjust for your configuration, hints here )

network={
    ssid="YOUR_WIFI_NETWORK_NAME_HERE"
    psk="YOUR_WIFI_PASSWORD_HERE"
    key_mgmt=WPA-PSK
}

Next stick your SD card into the Raspberry Pi Zero W, and plug it in.

After about a minute, use your SSH client to connect to HASSbian (or hassbian.local from a Mac), with the username pi. The default password is raspberry.

It’s a good idea to change the password. To do so, use the passwd command.

Next, type the following two commands into the SSH console:

$ sudo systemctl enable install_homeassistant.service
$ sudo systemctl start install_homeassistant.service

Wait about 15-20 minutes and voilà you have your Home Assistant on your Raspberry Pi Zero W in 30 minutes.

To try it out, go to http://hassbian:8123 or http://hassbian.local:8123 if you’re using Mac.

For further details about HASSbian, take a look at the documentation.


HASSbian 1.21 - It's about time isn't it

two minutes reading time
  • Technology
Comments

Hassbian 1.21 - It’s about time isn’t it

Since I, the developer of HASSbian, have been moving, started a new job and so on I’ve had few moments over for HASSbian development. The 1.2 release has been in pre-release for a few months now and just not communicated out that well. Hopefully this release changes that and I’ll do my best to release more often. There’s no simple way to update from 1.1 to 1.21 but 95% of the changes can be done by installing the hassbian-config package. For more information have a look at the hassbian-config page.

Hassbian 1.22 - Sins of last night

Development is sometimes fast and joyful but mistakes are made at times.

With the release of 1.21 a small problem with the OpenZWave build script wasn’t corrected even tough it was a known bug. Problem is simple as it’s only a problem with the symlink created for to the configuration folder for OpenZWave. This has been fixed and we bring some new things since they where ready anyway. The list below has been augmented with the updated information.

Hassbian-config

To allow you to customize your installation further, we have included a tool called hassbian-config. This tool comes with a set of packages that can easily be installed for easier customization of your Home Assistant installation. This replaces the hassbian-scripts functionality from 1.1.

  • Install Hue. Configures the Python executable to allow usage of low numbered ports for use with Emulated Hue component thats used with Amazon Echo, Google Home and Mycroft.ai.
  • Install Mosquitto MQTT server. Installs the latest Mosquitto package and client tools from the Mosquitto projects official repository. Now includes websocket support.
  • Install Libcec. Adds local HDMI CEC support.
  • Install Open Z-Wave-pip. Installs Python Open Z-Wave from a pip package. This is the quickest and recommended way of installing Z-Wave support but does not OZWCP pre-installed.
  • Install Open Z-Wave. Installs Python Open Z-Wave and OZWCP from git.
  • Install Samba. Allows anyone on your network to edit your configuration from any computer. This share is unsecured and it’s usage is not recommended if you share your network with others.
  • Install Tellstick. Installs the Tellstick package for controlling and using a connected Tellstick.
  • Install Tradfri. Installs dependencies for using IKEA Trådfri.

Spring cleaning

With this image there also quite a bit of cleaning of the base system and the script that generates our Raspberry Pi image.

  • Replaced the hassbian-scripts folder with hassbian-config.
  • Update pi-gen. Our build script has been upgraded to follow the Raspbian image closer once again. Now you could build this image with Docker if your so inclined.
  • Added libtool and autoconf package. Dependencies for some of the pip packages.
  • Pi ZeroW should now work with the image.

To follow discussions about the development of the HASSbian image or to contribute join our Discord chat server.

To get started with the new image, check out the installation instructions in the getting started section.


Setting up InfluxDB and Grafana using Docker

two minutes reading time
  • How-To
Comments

Home Assistant collects volumes of (time series) data that are well suited for some fancy graphs. Although the History component provides some nice plots, I am sure you have always wanted those fancy Grafana plots. The problem, however, is that low-powered device such as Raspberry Pi that most of us use for our Home Assistant setup are not well suited for such operation.

Instead of running InfluxDB and Grafana on a Raspberry Pi or a different system and go through the classic approach of installing both tools separately, you can run them in a Docker container on another machine. For this tutorial, I am using a Synology NAS, but the instructions should apply to other devices that can run Docker. Just follow the steps below:

  1. SSH into your NAS. You may have to run sudo su if you are getting permission errors.
  2. Download the docker-statsd-influxdb-grafana image using the command: docker pull samuelebistoletti/docker-statsd-influxdb-grafana
  3. To start the container for the first-time launch:
    docker run -d \
      --name docker-statsd-influxdb-grafana \
      -p 3003:3003 \
      -p 3004:8083 \
      -p 8086:8086 \
      -p 22022:22 \
      -p 8125:8125/udp \
      samuelebistoletti/docker-statsd-influxdb-grafana:latest
    
  4. The image should now be running and both InfluxBD and Grafana should be now up and running.
  5. You can access InfluxDB at http://NAS_IP_ADDRESS:3004/ and Grafana at http://NAS_IP_ADDRESS:3003/
  6. Navigate to http://NAS_IP_ADDRESS:3004/ and create the database home_assistant using the command CREATE DATABASE home_assistant.

  7. Now, you need to configure Home Assistant to use InfluxDB. Since, we did not add any username/password to our database, we can simply add the following to our configuration.yaml (replace the IP address with that of the device running Docker) and restart Home Assistant to setup InfluxDB (you will have to fine tune it based on your preferences):
    influxdb:
      host: 192.168.2.113
    
  8. Next, we need to configure Grafana to use InfluxDB. Navigate to http://NAS_IP_ADDRESS:3003/ to access Grafana (login with username and password root) and add your first data source. Here’s how you can configure Grafana to use InfluxDB database. Note that 192.168.2.113 is the IP address of my NAS.

  9. You should see Data source is working if you have configured everything correctly.
  10. With all that configured, you are now ready for the fun stuff. You can create as many dashboards as you want and then import the same in Home Assistant.
  11. To add the Grafana dashboard in HA, use the following config:
    panel_iframe:
      router:
        title: 'Temperature'
        url: 'http://192.168.2.113:3003/dashboard/db/temperature?edit&tab=time%20range'
    

    The URL can be obtained by clicking Share Dashboard link on your dashboard:


Hardware Contest 2017

Less than one minute reading time
  • Community
Comments

We have four submissions for our Hardware Contest 2017.

The voting is now open. To keep things simple are we using the voting feature of the forum. Vote for your choices.

End of the voting period: April, 30 2017 - 23.59 UTC