Alexa / Amazon Echo
There are a few ways that you can use Amazon Echo and Home Assistant together.
- Build custom commands to use
- Create a new Flash Briefing source
- Alternative: use the Emulated Hue component to trick Alexa to thinking Home Assistant is a Philips Hue hub.
Amazon has released Echosim, a website that simulates the Alexa service in your browser. That way it is easy to test your skills without having access to a physical Amazon Echo.
I want to build custom commands to use with Echo
The built-in Alexa component allows you to integrate Home Assistant into Alexa/Amazon Echo. This component will allow you to query information and call services within Home Assistant by using your voice. Home Assistant offers no built-in sentences but offers a framework for you to define your own.
Requirements
Amazon requires the endpoint of a skill to be hosted via SSL. Self-signed certificates are ok because our skills will only run in development mode. Read more on our blog about how to set up encryption for Home Assistant. When running Hass.io, using the Let’s Encrypt the and Duck DNS add-ons is the easiest method. If you are unable to get HTTPS up and running, consider using this AWS Lambda proxy for Alexa skills.
Additionally, note that at the time of this writing, your Alexa skill endpoint must accept requests over port 443 (Home Assistant default to 8123). There are two ways you can handle this:
- In your router, forward external 443 to your Home Assistant serving port (defaults to 8123) OR
- Change your Home Assistant serving port to 443 this is done in the
httpsection with the theserver_portentry in yourconfiguration.yamlfile
To get started with Alexa skills:
- Log in to Amazon developer console
- Click the Alexa button at the top of the console
- Click the yellow “Add a new skill” button in the top right
- Skill Type: Custom Interaction Model (default)
- Name: Home Assistant
- Invocation name: home assistant (or be creative, up to you)
- Version: 1.0
- Endpoint:
- https
https://YOUR_HOST/api/alexa?api_password=YOUR_API_PASSWORD
You can use this specially sized Home Assistant logo as the large icon and this one as the small one.
Configuring your Amazon Alexa skill
Alexa works based on intents. Each intent has a name and variable slots. For example, a LocateIntent with a slot that contains a User. Example intent schema:
{
  "intents": [
    {
      "intent": "LocateIntent",
      "slots": [
      {
          "name": "User",
          "type": "AMAZON.US_FIRST_NAME"
        }]
    },
    {
      "intent": "WhereAreWeIntent",
      "slots": []
    }
  ]
}
To bind these intents to sentences said by users you define utterances. Example utterances can look like this:
LocateIntent Where is {User}
LocateIntent Where's {User}
LocateIntent Where {User} is
LocateIntent Where did {User} go

WhereAreWeIntent where we are
This means that we can now ask Alexa things like:
- Alexa, ask Home Assistant where Paul is
- Alexa, ask Home Assistant where we are
Configuring Home Assistant
When activated, the Alexa component will have Home Assistant’s native intent support handle the incoming intents. If you want to run actions based on intents, use the intent_script component.
To enable Alex add the following entry to your configuration.yaml file:
alexa:
Working With Scenes
One of the most useful applications of Alexa integrations is to call scenes directly. This is easily achieved with some simple setup on the Home Assistant side and by letting Alexa know which scenes you want to run.
First, we will configure Alexa. In the Amazon Interaction module add this to the intent schema:
{
  "intent": "ActivateSceneIntent",
  "slots":
  [
    {
      "name" : "Scene",
      "type" : "Scenes"
    }
  ]
}
Then create a custom slot type called Scenes listing every scene you want to control:
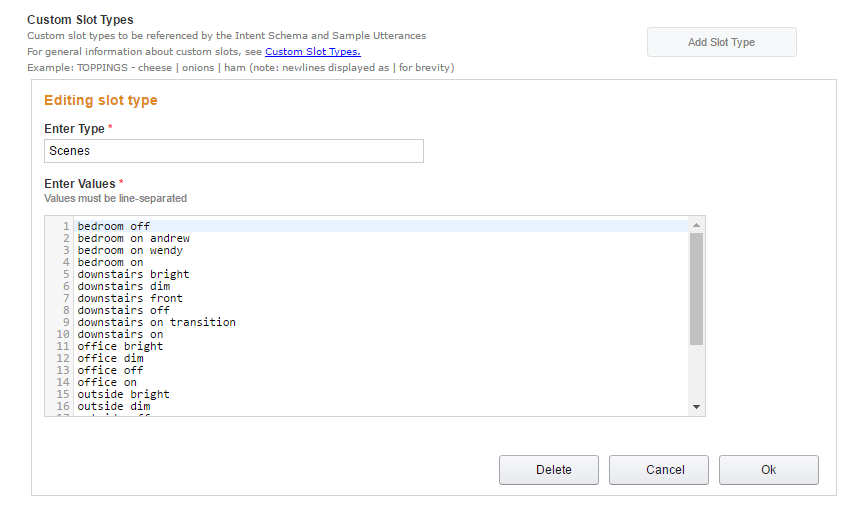 Custom slot type for scene support.
The names must exactly match the scene names (minus underscores - amazon discards them anyway and we later map them back in with the template).
Add a sample utterance:
ActivateSceneIntent activate {Scene}
Then add the intent to your intent_script section in your HA config file:
intent_script:
  ActivateSceneIntent:
    action:
      service: scene.turn_on
      data_template:
        entity_id: scene.{{ Scene | replace(" ", "_") }}
    speech:
      type: plain
      text: OK
Here we are using templates to take the name we gave to Alexa e.g. downstairs on and replace the space with an underscore so it becomes downstairs_on as Home Assistant expects.
Now say Alexa ask Home Assistant to activate <some scene> and Alexa will activate that scene for you.
Adding Scripts
We can easily extend the above idea to work with scripts as well. As before, add an intent for scripts:
{
  "intent": "RunScriptIntent",
  "slots":
  [
    {
      "name" : "Script",
      "type" : "Scripts"
    }
  ]
}
Create a custom slot type called Scripts listing every script you want to run:
 Custom slot type for script support.
Add a sample utterance:
RunScriptIntent run {Script}
Then add the intent to your intent_script section in your HA config file:
intent_script:
  RunScriptIntent:
    action:
      service: script.turn_on
      data_template:
        entity_id: script.{{ Script | replace(" ", "_") }}
    speech:
      type: plain
      text: OK
Now say Alexa ask Home Assistant to run <some script> and Alexa will run that script for you.
Support for Launch Requests
There may be times when you want to respond to a launch request initiated from a command such as “Alexa, Red Alert!”.
To start, you need to get the skill id:
- Log into Amazon developer console
- Click the Alexa button at the top of the console
- Click the Alexa Skills Kit Get Started button
- Locate the skill for which you would like Launch Request support
- Click the “View Skill ID” link and copy the ID
The configuration is the same as an intent with the exception being you will use your skill ID instead of the intent name.
intent_script:
  amzn1.ask.skill.08888888-7777-6666-5555-444444444444:
    action:
      service: script.turn_on
      entity_id: script.red_alert
    speech:
      type: plain
      text: OK
Giving Alexa Some Personality
In the examples above, we told Alexa to say OK when she successfully completed the task. This is effective but a little dull! We can again use templates to spice things up a little.
First create a file called alexa_confirm.yaml with something like the following in it (go on, be creative!):
          >
          {{ [
          "OK",
          "Sure",
          "If you insist",
          "Done",
          "No worries",
          "I can do that",
          "Leave it to me",
          "Consider it done",
          "As you wish",
          "By your command",
          "Affirmative",
          "Yes oh revered one",
          "I will",
          "As you decree, so shall it be",
          "No Problem"
          ] | random }}
Then, wherever you would put some simple text for a response like OK, replace it with a reference to the file so that:
text: OK
becomes:
text: !include alexa_confirm.yaml
Alexa will now respond with a random phrase each time. You can use the include for as many different intents as you like so you only need to create the list once.
Flash Briefing Skills
As of version 0.31 Home Assistant supports the new Alexa Flash Briefing Skills API. A Flash Briefing Skill adds a new Flash Briefing source that is generated by Home Assistant.
Configuring a Flash Briefing skill in Home Assistant
You can use templates for the title, audio, text and display_url configuration parameters.
Here’s an example configuration of a Flash briefing skill that will tell you who is at home:
# Example configuration.yaml entry
alexa:
  flash_briefings:
    whoishome:
      - title: Who's at home?
        text: >
          {%- if is_state('device_tracker.paulus', 'home') and
                 is_state('device_tracker.anne_therese', 'home') -%}
            You are both home, you silly
          {%- else -%}
            Anne Therese is at {{ states("device_tracker.anne_therese") }}
            and Paulus is at {{ states("device_tracker.paulus") }}
          {% endif %}
You can add multiple items for a feed if you want. The Amazon required uid and timestamp will be randomly generated at startup and change at every restart of Home Assistant.
Please refer to the Amazon documentation for more information about allowed configuration parameters and formats.
Configuring your Flash Briefing skill
- Log in to Amazon developer console
- Click the Alexa navigation tab at the top of the console
- Click on the “Get Started >” button under “Alexa Skills Kit”
- Click the yellow “Add a new skill” button in the top right
- Skill Information
- For Skill Type select “Flash Briefing Skill API”
- You can enter whatever name you want
- Hit “Next”
- Interaction Model
- Nothing to do here
- Configuration
- Add new feed
- For URL, enter
https://YOUR_HOST/api/alexa/flash_briefings/BRIEFING_ID?api_password=YOUR_API_PASSWORDwhereBRIEFING_IDis the key you entered in your configuration (such aswhoishomein the above example). NOTE: Do not use a non-standard http or https port, AWS will not connect to it. - You can use this specially sized Home Assistant logo as the Feed Icon
- All other settings are up to you
- Hit “Next”
- For URL, enter
- Add new feed
- Test
- Having passed all validations to reach this screen, you can now click on “< Back to All Skills” as your flash briefing is now available as in “Development” service.
- Skill Information
- To invoke your flash briefing, open the Alexa app on your phone or go to the Alexa Settings Site, open the “Skills” configuration section, select “Your Skills”, scroll to the bottom, tap on the Flash Briefing Skill you just created, enable it, then manage Flash Briefing and adjust ordering as necessary. Finally ask your Echo for your “news”,”flash briefing”, or “briefing”.