Snips
The Snips Voice Platform allows users to add powerful voice assistants to their Raspberry Pi devices without compromising on Privacy. It runs 100% on-device, and does not require an Internet connection. It features Hotword Detection, Automatic Speech Recognition (ASR), Natural Language Understanding (NLU) and Dialog Management.
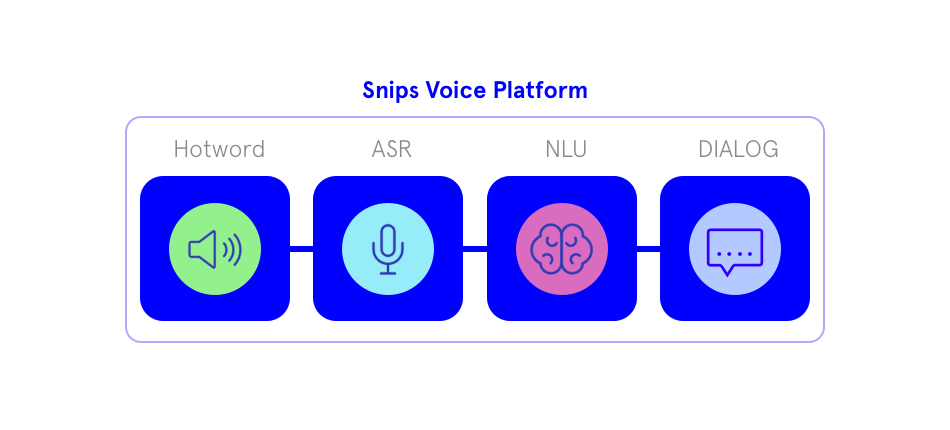
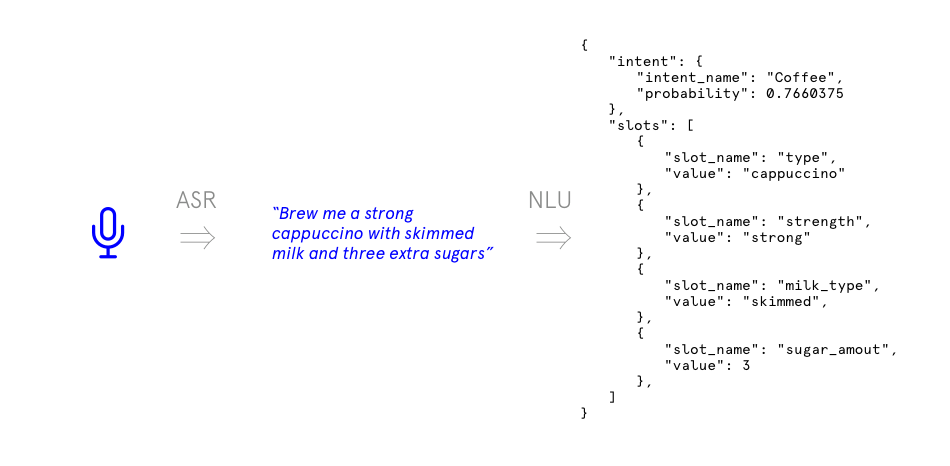
Snips takes voice or text as input, and produces intents as output, which are explicit representations of an intention behind an utterance, and which can subsequently be used by Home Assistant to perform appropriate actions.
The Snips Voice Platform
Installation
The Snips Voice Platform is installed on Raspberry Pi with the following command:
(pi) $ curl https://install.snips.ai -sSf | sh
Creating an assistant
Snips assistants are created via the Snips Console. Once trained, the assistant should be downloaded and copied to the Raspberry Pi:
$ scp assistantproj_XXX.zip pi@pi_hostname:/home/pi/assistant.zip
and installed locally via the snips-install-assistant helper script:
(pi) $ sudo snips-install-assistant assistant.zip
Running Snips
Make sure that a microphone is plugged to the Raspberry Pi. If you are having trouble setting up audio, we have written a guide on Raspberry Pi Audio Configuration.
Start the Snips Voice Platform using the snips command:
(pi) $ snips
Snips is now ready to take voice commands from the microphone. To trigger the listening, simply say
Hey Snips
followed by a command, e.g.
Set the lights to green in the living room
We should see the transcribed phrase in the logs, as well as a properly parsed intent. The intent is published on MQTT, on the hermes/nlu/intentParsed topic. The Snips Home Assistant component subscribes to this topic, and handles the intent according to the rules defined in configuration.yaml, as explained below.
Optional: specifying an external MQTT broker
By default, Snips runs its own MQTT broker. But we can also tell Snips to use an external broker by specifying this when launching Snips. In this case, instead of running the snips command above (which assumes we are using the internal MQTT broker), we use the full launch command with explicitly specified parameters (replace MQTT_BROKER_IP and MQTT_BROKER_PORT with appropriate values):
$ docker run -t --rm --name snips --log-driver none -v /home/pi/.asoundrc:/root/.asoundrc -v /opt/snips/config:/opt/snips/config --privileged -v /dev/snd:/dev/snd snipsdocker/platform --mqtt MQTT_BROKER_IP:MQTT_BROKER_PORT
For more details on launch options, check the documentation on Snips Platform Commands.
Home Assistant configuration
Specifying the MQTT broker
Messages between Snips and Home Assistant are passed via MQTT. We must tell Home Assistant which MQTT broker to use by adding the following entry to configuration.yaml:
mqtt:
  broker: MQTT_BROKER_IP
  port: MQTT_BROKER_PORT
As explained above, Snips by default runs an MQTT broker on port 9898. So if we wish to use this broker, the entry will look as follows:
mqtt:
  broker: 127.0.0.1
  port: 9898
Triggering actions
In Home Assistant, we trigger actions based on intents produced by Snips using the intent_script component. For instance, the following block handles ActivateLightColors intents (included in the Snips IoT intent bundle) to change light colors:
snips:

intent_script:
  ActivateLightColor:
    action:
      - service: light.turn_on
        data_template:
          entity_id: light.{{ objectLocation | replace(" ","_") }}
          color_name: {{ objectColor }}