Remote Access with TLS/SSL via Let's Encrypt
Before exposing your Home Assistant instance to the outside world it is ESSENTIAL that you have set a password following the advice on the http page.
This guide was added by mf_social on 16/03/2017 and was valid at the time of writing. This guide makes the following assumptions:
- You can access your Home Assistant instance across your local network, and access the device that it is on via SSH from your local network.
- You know the internal IP address of your router and can access your router’s configuration pages.
- You have already set up a password for your Home Assistant instance, following the advice on this page: http
- You want to access your Home Assistant instance when you are away from home (ie, not connected to your local network) and secure it with a TLS/SSL certificate.
- You have a basic understanding of the phrases I have used so far.
- You are not currently running anything on port 80 on your network (you’d know if you were).
- If you are not using Home Assistant on a Debian/Raspian/Hassbian system you will be able to convert any of the terminology I use in to the correct syntax for your system.
- You understand that this is a ‘guide’ covering the general application of these things to the general masses and there are things outside of the scope of it, and it does not cover every eventuality (although I have made some notes where people may stumble). Also, I have used some turns of phrase to make it easier to understand for the novice reader which people of advanced knowledge may say is innacurate. My goal here is to get you through this guide with a satisfactory outcome and have a decent understanding of what you are doing and why, not to teach you advanced internet communication protocols.
- Each step presumes you have fully completed the previous step succesfully, so if you did an earlier step following a different guide, please ensure that you have not missed anything out that may affect the step you have jumped to, and ensure that you adapt any commands to take in to account different file placements from other guides.
Steps we will take:
- 0 - Gain a basic level of understanding around IP addresses, port numbers and port forwarding
- 1 - Set your device to have a static IP address
- 2 - Set up port forwarding without TLS/SSL and test connection
- 3 - Set up a DuckDNS account
- 4 - Obtain a TLS/SSL certificate from Let’s Encrypt
- 5 - Check the incoming connection
- 6 - Clean up port forwards
- 7 - Set up a sensor to monitor the expiry date of the certificate
- 8 - Set up an automatic renewal of the TLS/SSL certificate
- 9 - Set up an alert to warn us if something went wrong
0 - Gain a basic level of understanding around IP addresses, port numbers and port forwarding
An IP address is a bit like a phone number. When you access your Home Assistant instance you type something similar to 192.168.0.200:8123 in to your address bar of your browser. The bit before the colon is the IP address (in this case 192.168.0.200) and the bit after is the port number (in this case 8123). When you SSH in to the device running Home Assistant you will use the same IP address, and you will use port 22. You may not be aware that you are using port 22, but if you are using Putty look in the box next to where you type the IP address, you will see that it has already selected port 22 for you.
So, if an IP address is like a phone number, a port number is like an extension number. An analogy would be if you phone your local doctors on 192-1680-200 and the receptionist answers, you ask to speak to Dr. Smith and she will put you through to extension 8123, which is the phone Dr. Smith is sitting at. The doctors surgery is the device your Home Assistant is running on, Dr. Smith is your Home Assistant. Thusly, your Home Assistant instance is ‘waiting for your call’ on port 8123, at the device IP 192.168.0.200 .
Now, to speak to the outside world your connection goes through a router. Your router will have two IP addresses. One is the internal network number, most likely 192.168.0.1 in my example, and an external IP address that incoming traffic is sent to. In the example of calling the doctors, the external IP is your telephone number’s area code.
So, when we want to connect to our Home Assistant instance from outside our network we will need to call the correct extension number, at the correct phone number, in the correct area code.
We will be looking for a system to run like this (in this example I will pretend our external IP is 12.12.12.12):
Outside world -> 12.12.12.12:8123 -> your router -> 192.168.0.200:8123
Sounds simple? It really is except for two small, but easy to overcome, complications:
- IP addresses are often dynamically allocated, so they can change.
- Because of the way the internet works you cannot chain IP addresses together to get from where you are, to where you want to go.
To get around the issue of changing IP addresses we must remember that there are two IP addresses affected. Your external one (which we will ‘call’ to get on to your network from the internet) and your internal one (192.168.0.200 in the example I am currently using).
So, we can use a static IP to ensure that whenever our device running Home Assistant connects to our router it always uses the same address. This way our internal IP never changes. This is covered in step 1 below.
We then have no control over our external IP, as our Service Provider will give us a new one at random intervals. To fix this we will use a service called DuckDNS which will give us a name for our connection (something like examplehome.duckdns.org) and behind the scenes will continue to update your external IP. So no matter how many times the IP address changes, typing examplehome.duckdns.org in to our browser will convert to the correct, up-to-date, IP address. This is covered in step 3 below.
To get around the issue of not being able to chain the IP addresses together (I can’t say I want to call 12:12:12:12 and be put through to 192.168.0.200, and then be put through to extension 8123) we use port forwarding. Port forwarding is the process of telling your router which device to allow the outside connection to speak to. In the doctors surgery example, port forwarding is the receptionist. This takes a call from outside, and forwards it to the correct extension number inside. It is important to note that port forwarding can forward an incoming request for one port to a different port on your internal network if you so choose, and we will be doing this later on. The end result being that when we have our TSL/SSL certificate our incoming call will be requesting port 443 (because that is the SSL port, like the SSH port is always 22), but our port forwarding rule will forward this to our HA instance on port 8123. When this guide is completed we will run something like this:
Outside world -> https://examplehome.duckdns.org -> 12.12.12.12:443 -> your router -> 192.168.0.200:8123
So, let’s make it happen…
1 - Set your device to have a static IP address
Whenever a device is connected to a network it has an IP address. This IP address is often dynamically assigned to the device on connection. This means there are occasions where the IP address you use to access Home Assistant, or SSH in to the device running Home Assistant, may change. Setting a static IP address means that the device will always be on the same address.
SSH in to your system running Home Assistant and login.
Type the following command to list your network interfaces:
$ ifconfig
You will receive an ouput similar to the image below:
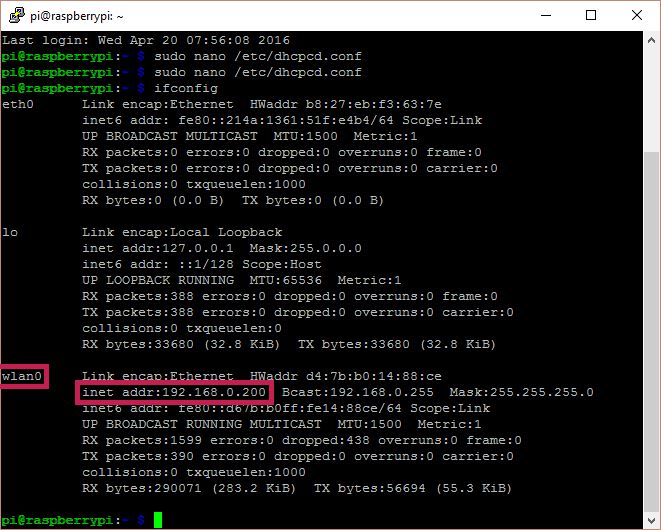 Screenshot
Make a note of the interface name and the IP address you are currently on. In the picture it is the wireless connection that is highlighted, but with your setup it may be the wired one (eth0 or similar), make sure you get the correct information.
Then type the following command to open the text file that controls your network connection:
$ sudo nano /etc/dhcpcd.conf
At the bottom of the file add the following lines:
interface wlan0 <----- or the interface you just wrote down.

static ip_address=192.168.0.200/24  <---- the IP address you just wrote down with a '/24' at the end
static routers=192.168.0.1      <---- Your router's IP address
static domain_name_servers=192.168.0.1 <---- Your router's IP address
It is important to note that the first three bits of your static IP address and your router’s IP address should be the same, eg:
Router: 192.168.0.1

Yes
HA IP: 192.168.0.200

No
HA IP: 192.175.96.200
Press Ctrl + x to close the editor, pressing Y to save the changes when prompted.
Reboot your device running HA:
$ sudo reboot
When it comes back up check that you can SSH in to it again on the IP address you wrote down.
Make sure Home Assistant is running and access it via the local network by typing the IP address and port number in to the browser:
http://192.168.0.200:8123.
All working? Hooray! You now have a static IP. This will now always be your internal IP address for your Home Assistant device. This will be known as YOUR-HA-IP for the rest of this guide.
2 - Set up port forwarding without TLS/SSL and test connection
Log in to your router’s configuration pages and find the port forwarding options. This bit is hard to write a guide for because each router has a different way of presenting these options. Searching google for “port forwarding” and the name of your router may help. When you find it you will likely have options similar to:
Service name - Port Range - Local IP - Local Port - Protocol
You may also have other options (like ‘source IP’), these can usually be left blank or in their default state.
Set the port forwarding to:
Service name - ha_test
Port Range - 8123
Local IP - YOUR-HA-IP
Local Port - 8123
Protocol - Both
Then save the change. On my router you have to fill these values in, then press an ‘add’ button to add the new rule to the list, then save the changes. All routers have a different interface, but you must ensure that these rules are saved at this point. If you are unsure, you can reboot the router and log back in, if the rule is present it was saved, if not, it wasn’t!
Once you have saved this rule, go to your browser, and go to:
https://whatismyipaddress.com/
This will tell you your current external IP address
Type the external IP address in to the URL bar with http:// in front and :8123 after like so (12.12.12.12 is my example!):
http://12.12.12.12:8123
Can you see your Home Assistant instance? If not, your router may not support ‘loopback’ - try the next step anyway and if that works, and this one still doesn’t, just remember that you cannot use loopback, so will have to use internal addresses when you’re on your home network. More on this later on if it’s relevant to you.
Just to verify this isn’t some kind of witchcraft that is actually using your internal network, pick up your phone, disconnect it from your wifi so that you are on your mobile data and not connected to the home network, put the same URL in the browser on your phone.
Can you see it now, from a device that is definitely not connected to your local network? Excellent! You now have a remotely accesible Home Assistant instance.
But what if your external IP changes? Plus, remembering all those numbers is pretty hard, isn’t it? Read on to get yourself set up with a word-based URL at DuckDNS that will track any changes to your IP address so you don’t have to stress anymore.
3 - Set up a DuckDNS account
Open your browser and go to https://duckdns.org.
Sign in and create an account using one of the id validation options in the top right corner.
In the domains section pick a name for your subdomain, this can be anything you like, and click add domain.
The URL you will be using later to access your Home Assistant instance from outside will be the subdomain you picked, followed by duckdns.org . For our example we will say our URL is examplehome.duckdns.org
On the top left of duckdns.org select the install option. Then pick your operating system from the list. In our example we will use a Raspberry Pi. In the dropdown box select the URL you just created.
Duckdns.org will now generate personalised instructions for you to follow so that your device can update their website every time your IP address changes. Carefully follow the instructions given on duckdns.org to set up your device.
At the end of the instructions DuckDNS will suggest you set up port forwarding. No need, we have already done this in step 2.
What you have now done is set up DuckDNS so that whenever you type examplehome.duckdns.org in to your browser it will convert that to your router’s external IP address. Your external IP address will always be up to date because your device running Home Assistant will update DuckDNS every time it changes.
Now type your new URL in to your address bar on your browser with port 8123 on the end:
http://examplehome.duckdns.org:8123
What now happens behind the scenes is this:
- DuckDNS receives the request and forwards the request to your router’s external IP address (which has been kept up to date by your device running Home Assistant)
- Your router receives the request on port 8123 and checks the port forwarding rules
- It finds the rule you created in step 2 and forwards the request to your HA instance
- Your browser displays your Home Assistant instance frontend.
Did it work? Super!
You now have a remotely accesible Home Assistant instance that has a text-based URL and will not drop out if your service provider changes your IP. But, it is only as secure as the password you set, which can be snooped during your session by a malicious hacker with relative ease. So we need to set up some encryption with TLS/SSL, read on to find out how.
4 - Obtain a TLS/SSL certificate from Let’s Encrypt
First we need to set up another port forward like we did in step 2. Set your new rule to:
Service name - ha_letsencrypt
Port Range - 80
Local IP - YOUR-HA-IP
Local Port - 80
Protocol - Both
Remember to save the new rule.
In cases where your ISP blocks port 80 you will need to change the port forward options to forward port 443 from outside to port 443 on your Home Assistant device. Please note that this will limit your options for automatically renewing the certificate, but this is a limitation because of your ISP setup and there is not a lot we can do about it!
Now SSH in to the device your Home Assistant is running on.
If you’re running the ‘standard’ setup on a Raspberry Pi the chances are you just logged in as the ‘pi’ user. If not, you may have logged in as the Home Assistant user. There are commands below that require the Home Assistant user to be on the sudoers list. If you are not using the ‘standard’ pi setup it is presumed you will know how to get your Home Assistant user on the sudoers list before continuing. If you are running the ‘standard’ pi setup, from your ‘pi’ user issue the following command (where hass is the Home Assistant user):
$ sudo adduser hass sudo
If you did not already log in as the user that currently runs Home Assistant, change to that user (usually hass or homeassistant - you may have used a command similar to this in the past):
$ sudo su -s /bin/bash hass
Make sure you are in the home directory for the HA user:
$ cd
We will now make a directory for the certbot software, download it and give it the correct permissions:
$ mkdir certbot
$ cd certbot/
$ wget https://dl.eff.org/certbot-auto
$ chmod a+x certbot-auto
Now we will run the certbot program to get our ssl certificate. You will need to include your email address and your DuckDNS URL in the appropriate places:
$ ./certbot-auto certonly --standalone --preferred-challenges http-01 --email your@email.address -d examplehome.duckdns.org
Once the program has run it will generate a certificate and other files and place them in a folder /etc/letsencrypt/ .
Confirm this file has been populated:
$ ls /etc/letsencrypt/live/
This should show a folder named exactly after your DuckDNS URL.
Our Home Assistant user needs access to files within the letsencrypt folder, so issue the following commands to change the permissions.
$ sudo chmod 755 /etc/letsencrypt/live/
$ sudo chmod 755 /etc/letsencrypt/archive/
Did all of that go without a hitch? Wahoo! Your Let’s Encrypt certificate is now ready to be used with Home Assistant. Move to step 5 to put it all together
5 - Check the incoming connection
Following on from Step 4 your SSH will still be in the certbot folder. If you edit your configuration files over SSH you will need to change to your homeassistant folder:
$ cd ~/.homeassistant
If you use samba shares to edit your files you can exit your SSH now.
If during step 4 you had to use port 443 instead of port 80 to generate your certificate, you should delete that rule now.
Go to your router’s configuration pages and set up a new port forwarding rule, thus:
Service name - ha_ssl
Port Range - 443
Local IP - YOUR-HA-IP
Local Port - 8123
Protocol - Both
Remember to save the rule changes.
Now edit your configuration.yaml file to reflect the SSL entries and your base URL (changing the examplehome subdomain to yours in all three places):
http:
  api_password: YOUR_PASSWORD
  ssl_certificate: /etc/letsencrypt/live/examplehome.duckdns.org/fullchain.pem
  ssl_key: /etc/letsencrypt/live/examplehome.duckdns.org/privkey.pem
  base_url: examplehome.duckdns.org
You may wish to set up other options for the http component at this point, these extra options are beyond the scope of this guide.
Save the changes to configuration.yaml. Restart Home Assistant.
In step 3 we accessed our Home Assistant from the outside world with our DuckDNS URL and our port number. We are going to use a slightly different URL this time.
https://examplehome.duckdns.org
Note the S after http, and that no port number is added. This is because https will use port 443 automatically, and we have already set up our port forward to redirect this request to our Home Assistant instance on port 8123.
You should now be able to see your Home Assistant instance via your DuckDNS URL, and importantly note that your browser shows the connection as secure.
You will now NO LONGER be able to access your Home Assistant via your old internal IP address in the way you previously have. Your default way to access your Home Assistant instance, even from inside your house, is to use your DuckDNS URL.
In cases where you need to access via the local network only (which should be few and far between) you can access it with the following URL (note the added S after http):
https://YOUR-HA-IP:8123
…and accepting the browsers warning that you are connecting to an insecure site. This warning occurs because your certificate expects your incoming connection to come via your DuckDNS URL. It does not mean that your device has suddenly become insecure.
Some cases such as this are where your router does not allow ‘loopback’ or where there is a problem with incoming connections due to technical failure. In these cases you can still use your internal connection and safely ignore the warnings.
If you were previously using a webapp on your phone/tablet to access your Home Assistant you should delete the old one and create a new one with the new address. The old one will no longer work as it is not keyed to your new, secure URL. Instructions for creating your new webapp can be found here:
https://home-assistant.io/docs/frontend/mobile/
All done? Accessing your Home Assistant from across the world with your DuckDNS URL and a lovely secure logo on your browser? Ace! Now let’s clean up our port forwards so that we are only exposing the parts of our network that are absolutely neccesary to the outside world.
6 - Clean up port forwards
In step 2 we created a port forwarding rule called ha_test. This opens port 8123 to the world, and is no longer neccessary.
Go to your router’s configuration pages and delete the ha_test rule.
You should now have two rules in relation to Home Assistant for your port forwards, named:
ha_ssl and ha_letsencrypt
If you have any more for Home Assistant you should delete them now. If you only have ha_ssl this is probably because during step 4 you had to use port 443 instead of port 80, so we deleted the rule during step 5.
You are now part of one of two groups:
- If you have BOTH rules you are able to set up auto renewals of your certificates using port 80 and the standard http challenge, as performed above.
- If you only have one, you are still able to set up auto renewals of your certificates, but will have to specify additional options when renewing that will temporarily stop Home Assistant and use port 8123 for certificate renewal.
Please remember whether you are a ONE-RULE person or a BOTH-RULE person for step 8!
Let’s Encrypt certificates only last for 90 days. When they have less than 30 days left they can be renewed. Renewal is a simple process.
Move on to step 7 to see how to monitor your certificates expiry date, and be ready to renew your certificate when the time comes.
7 - Set up a sensor to monitor the expiry date of the certificate
Setting a sensor to read the number of days left on your TLS/SSL certificate before it expires is not required, but it has the following advantages:
- You can physically see how long you have left, pleasing your inner control freak
- You can set automations based on the number of days left
- You can set alerts to notify you if your certificate has not been renewed and is coming close to expiry.
- If you cannot set up automatic renewals due to your ISP blocking port 80, you will have timely reminders to complete the process manually.
If you do not wish to set up a sensor you can skip straight to step 8 to learn how to update your certificates.
The sensor will rely on a command line program that needs to be installed on your device running Home Assistant. SSH in to the device and run the following commands:
$ sudo apt-get update
$ sudo apt-get install ssl-cert-check
In cases where, for whatever reason, apt-get installing is not appropriate for your installation you can fetch the ssl-cert-check script from http://prefetch.net/code/ssl-cert-check bearing in mind that you will have to modify the command in the sensor code below to run the script from wherever you put it, modify permission if neccessary and so on.
To set up a senor add the following to your configuration.yaml (remembering to correct the URL for your DuckDNS):
sensor:
  - platform: command_line
    name: SSL cert expiry
    unit_of_measurement: days
    scan_interval: 10800
    command: "ssl-cert-check -b -c /etc/letsencrypt/live/examplehome.duckdns.org/cert.pem | awk '{ print $NF }'"
Save the configuration.yaml. Restart Home Assistant.
On your default_view you should now see a sensor badge containing your number of days until expiry. If you’ve been following this guide from the start and have not taken any breaks in between, this should be 89 or 90. The sensor will update every 3 hours. You can place this reading on a card using groups, or hide it using customize. These topics are outside of the scope of this guide, but information can be found on their respective components pages: Group and Customize
Got your sensor up and running and where you want it? Top drawer! Nearly there, now move on to the final steps to ensure that you’re never without a secure connection in the future.
8 - Set up an automatic renewal of the TLS/SSL certificate.
The certbot program we downloaded in step 4 contains a script that will renew your certificate. The script will only obtain a new certificate if the current one has less than 30 days left on it, so running the script more often than is actually needed will not cause any harm.
If you are a ONE-RULE person (from step 6), you can automatically renew your certificate with your current port mapping by temporarily stopping Home Assistant and telling certbot to bind port 8123 internally, and using a tls-sni challenge so that the Let’s Encrypt CA binds port 443 externally. The flags used to specify these additional steps are shown below.
If you are a TWO-RULE person (from step 6), you can automatically renew your certificate using a http-01 challenge and port 80.
There are a number of options for automating the renewal process:
Option 1:
Your certificate can be renewed as a ‘cron job’ - cron jobs are background tasks run by the computer at specified intervals (and are totally independant of Home Assistant). Defining cron is outside of the scope of this guide but you will have had dealings with crontab when setting up DuckDNS in step 3
To set a cron job to run the script at regular intervals:
- SSH in to your device running Home Assistant.
- Change to your Home Assistant user (command similar to):
$ su - s /bin/bash hass
- Open the crontab:
$ crontab -e
- If you are a TWO-RULE Person: Scroll to the bottom of the file and paste in the following line
30 2 * * 1 ~/certbot/certbot-auto renew --quiet --no-self-upgrade --standalone --preferred-challenges http-01
- If you are a ONE-RULE Person: Scroll to the bottom of the file and paste in the following line
30 2 * * 1 ~/certbot/certbot-auto renew --quiet --no-self-upgrade --standalone --preferred-challenges tls-sni-01 --tls-sni-01-port 8123 --pre-hook "sudo systemctl stop home-assistant@homeassistant.service" --post-hook "sudo systemctl start home-assistant@homeassistant.service"
- Let’s take a moment to look at the differences here:
- This method uses a
tls-snichallenge, so the Let’s Encrypt CA will attempt to bind port 443 externally (which you have forwarded) --tls-sni-01-port 8123tells certbot to bind port 8123 internally, which matches with the port forwarding rules that are already in place.- We define pre-hooks and post-hooks that stop our Home Assistant service before certbot runs, freeing port 8123 for certificate renewal, and restart Home Assistant after renewal is complete.
- This method uses a
- Save the file and exit
Option 2:
You can set an automation in Home Assistant to run the certbot renewal script.
Add the following sections to your configuration.yaml if you are a TWO-RULE person
shell_command:
  renew_ssl: ~/certbot/certbot-auto renew --quiet --no-self-upgrade --standalone --preferred-challenges http-01

automation:
  - alias: 'Auto Renew SSL Cert'
    trigger:
      platform: numeric_state
      entity_id: sensor.ssl_cert_expiry
      below: 29
    action:
      service: shell_command.renew_ssl
If you are a ONE-RULE person, replace the certbot-auto command above with ~/certbot/certbot-auto renew --quiet --no-self-upgrade --standalone --preferred-challenges tls-sni-01 --tls-sni-01-port 8123 --pre-hook "sudo systemctl stop home-assistant@homeassistant.service" --post-hook "sudo systemctl start home-assistant@homeassistant.service"
Option 3:
You can manually update the certificate when your certificate is less than 30 days to expiry.
To manually update:
- SSH in to your device running Home Assistant.
- Change to your Home Assistant user (command similar to):
$ su - s /bin/bash hass
- Change to your certbot folder
$ cd ~/certbot/
- Run the renewal command
$ ./certbot-auto renew --quiet --no-self-upgrade --standalone --preferred-challenges http-01
- If you are a ONE-RULE person, replace the
certbot-autocommand above with~/certbot/certbot-auto renew --quiet --no-self-upgrade --standalone --preferred-challenges tls-sni-01 --tls-sni-01-port 8123 --pre-hook "sudo systemctl stop home-assistant@homeassistant.service" --post-hook "sudo systemctl start home-assistant@homeassistant.service"
So, now were all set up. We have our secured, remotely accesible HA instance and we’re on track for keeping our certificates up to date. But what if something goes wrong? What if the automation didn’t fire? What if the cron job forgot to run? What if the dog ate my homework? Read on to set up an alert so you can be notified in plenty of time if you need to step in and sort out any failures.
9 - Set up an alert to warn us if something went wrong.
We set up our automatic renewal of our certificates and whatever method we used the certificate should be renewed on or around 30 days before it expires. But what if a week later it still hasn’t been? This alert will go off if the expiry time on the certificate gets down to 21 days. This will give you 3 weeks to fix the problem, get your new certificate installed and get another 90 days of secure Home Assistant connections in play.
In your configuration.yaml add the following automation, adding your preferred notification platform where appropriate:
automation:
  - alias: 'SSL expiry notification'
    trigger:
    platform: numeric_state
    entity_id: sensor.ssl_cert_expiry
    below: 21
  action:
    service: notify.[your_notification_preference]
    data:
      message: 'Warning - SSL certificate expires in 21 days and has not been automatically renewed'
If you receive this warning notification, follow the steps for a manual update from step 8. Any error messages received at that point can be googled and resolved. If the manual update goes without a hitch there may be something wrong with your chosen method for automatic updates, and you can start troubleshooting from there.
So, that’s it. We’ve taken a Home Assistant instance that was only reachable on the local network, made it accessible from the internet, secured it, and set up a system to ensure that it always stays secure. Well done, go and treat yourself to a cookie!